Lightning Fast Shipping
Old-Fashioned Customer Service
Competitive Prices & Qty Discounts
Commercial Grade Products
My Cart Id is 85466377
You have no items in your shopping cart.
RSS

Blog posts of '2025' 'September'

Taking Your Patio String Lights to the Next Level with Drops


Taking Your Patio String Lights to the Next Level with Drops


Anyone can head to a big box store and grab a standard set of patio string lights—but when our customers asked for more, we listened. At Novelty Lights, we believe outdoor lighting should be as refined as the spaces it enhances.


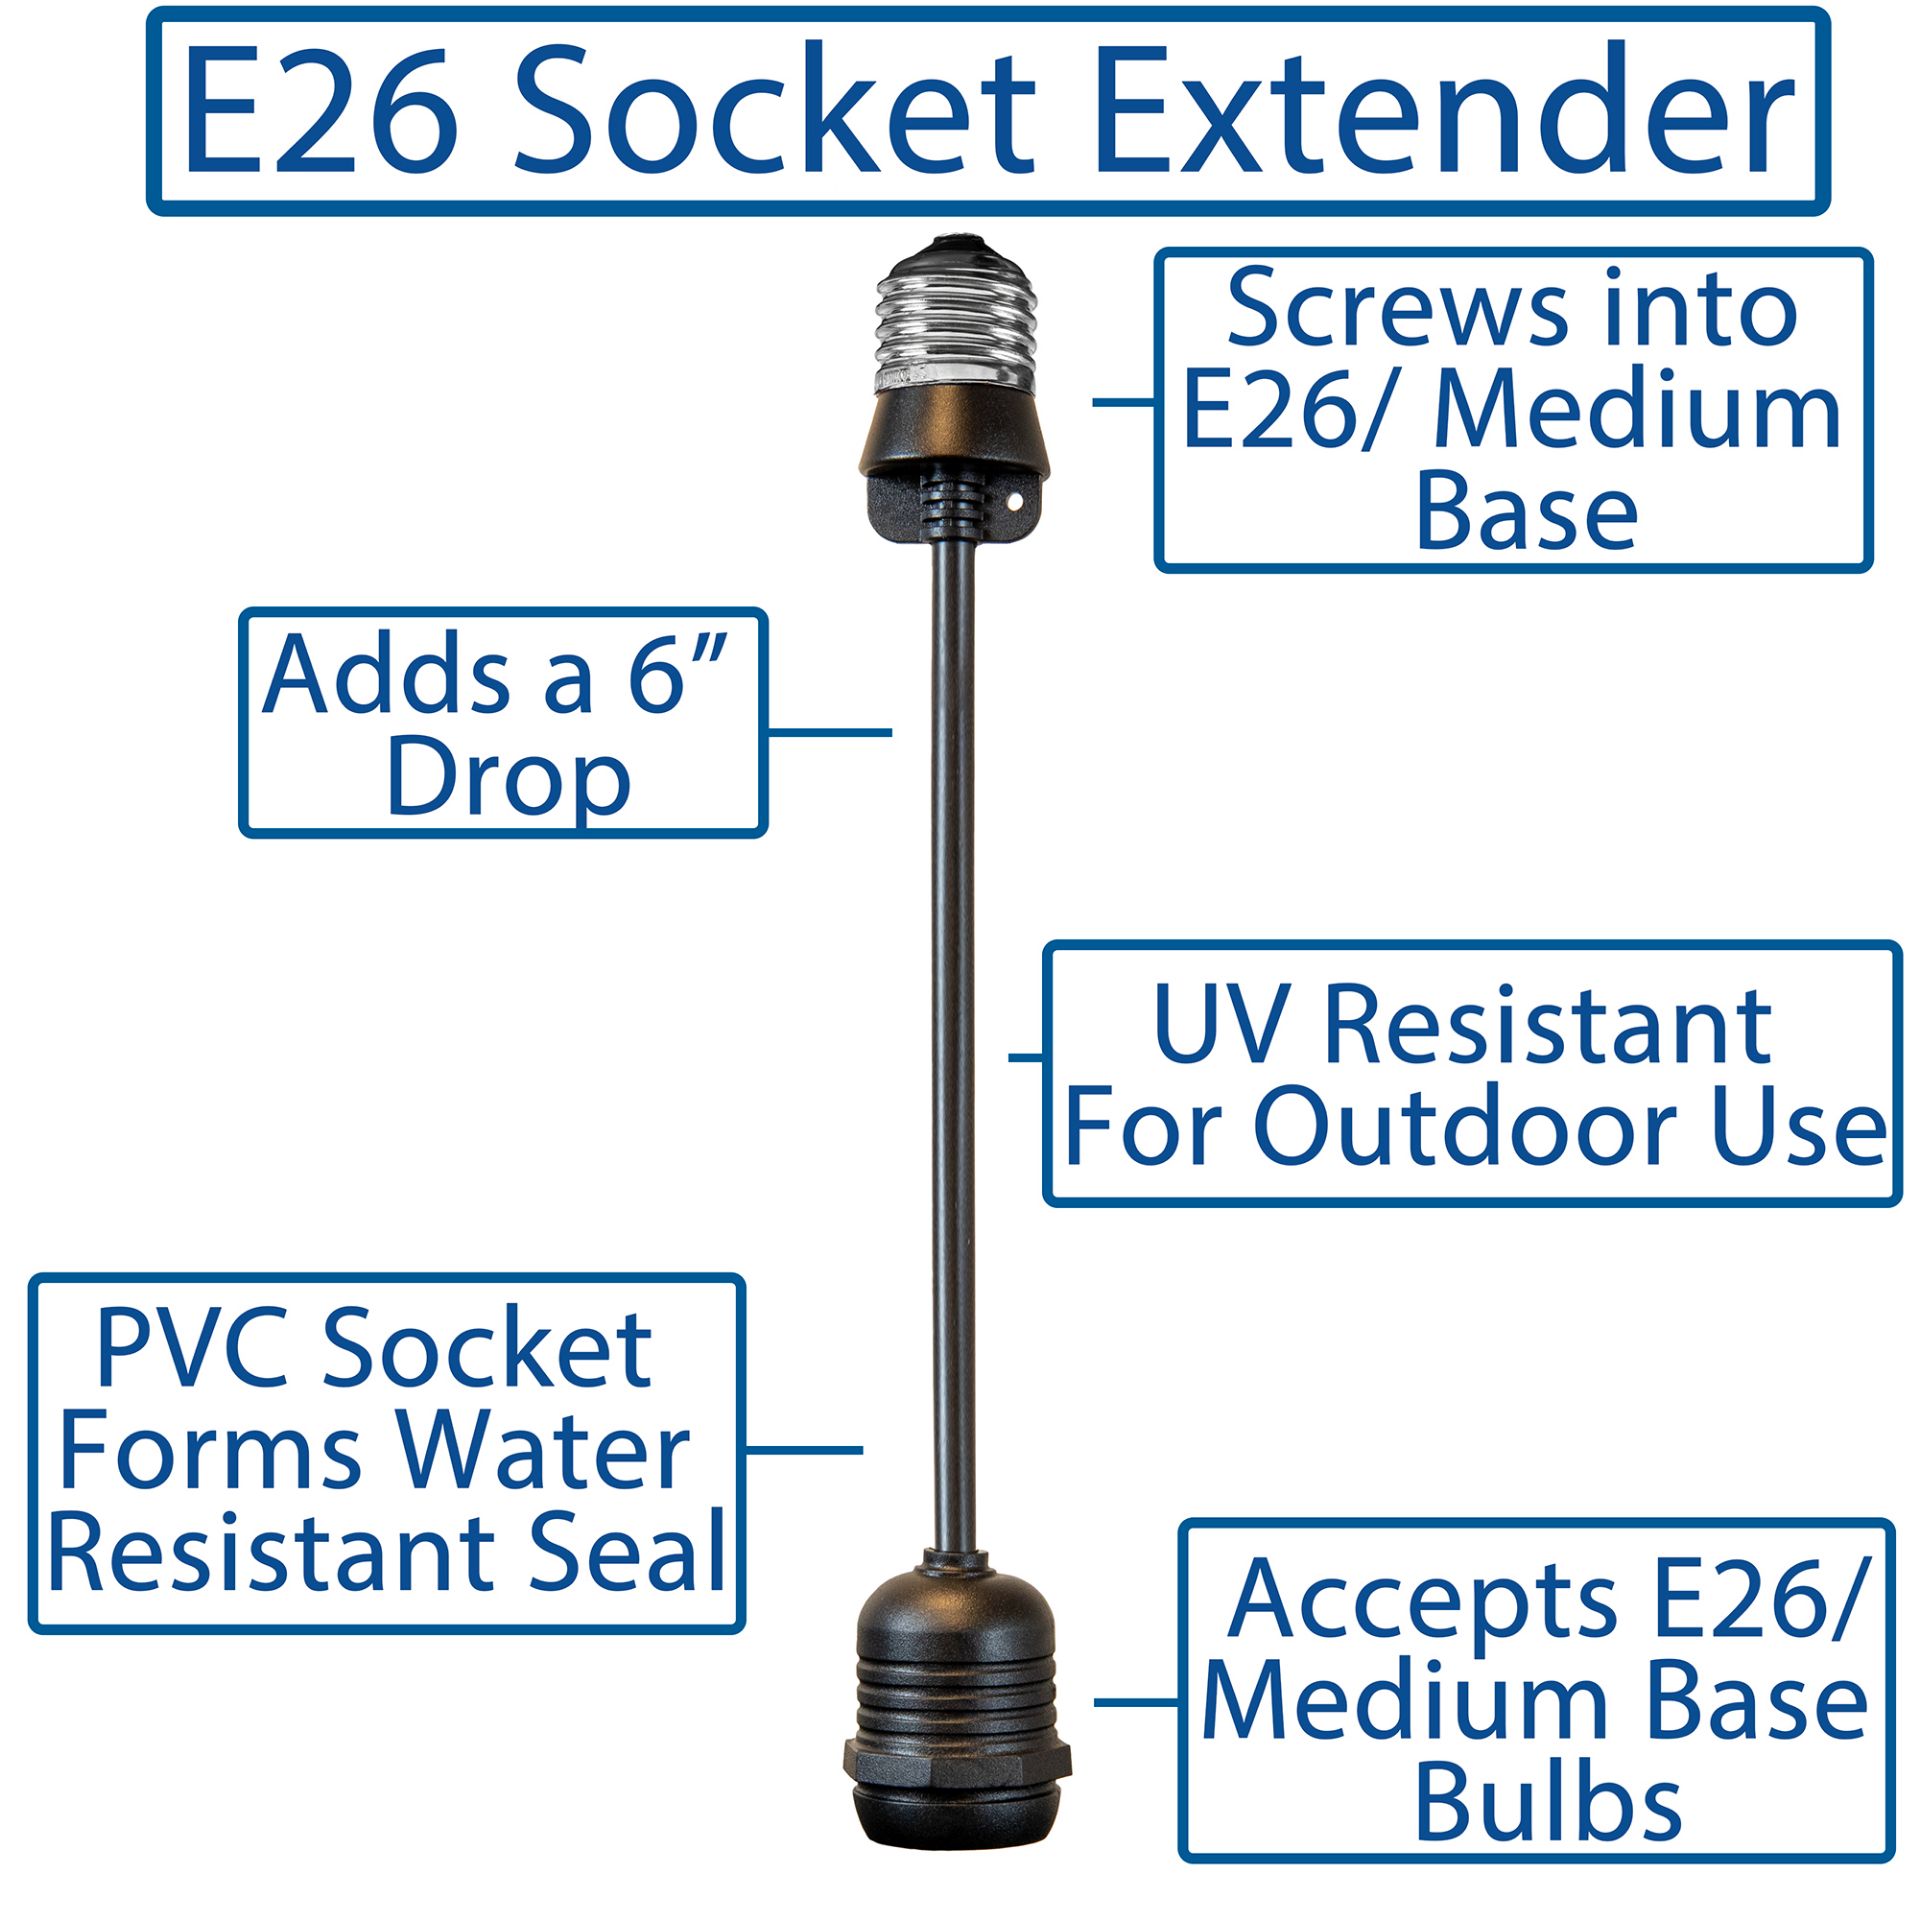
That's why we developed Drops—an elegant solution that transforms ordinary commercial string lights into something truly extraordinary. These heavy-duty socket extenders are designed to screw directly into the sockets of our commercial-grade light strings, allowing bulbs to hang lower and at varied heights.

The result? A multi-dimensional, designer-inspired look that brings depth, movement, and sophistication to patios, pergolas, and outdoor venues.


Pair them with our latest S14 LED innovations to complete the upscale effect:

Whether you're setting the mood for a backyard soirée or upgrading a commercial space, Drops give you the freedom to design lighting with dimensions and distinction. Because you're not just lighting a space, you're creating an experience.

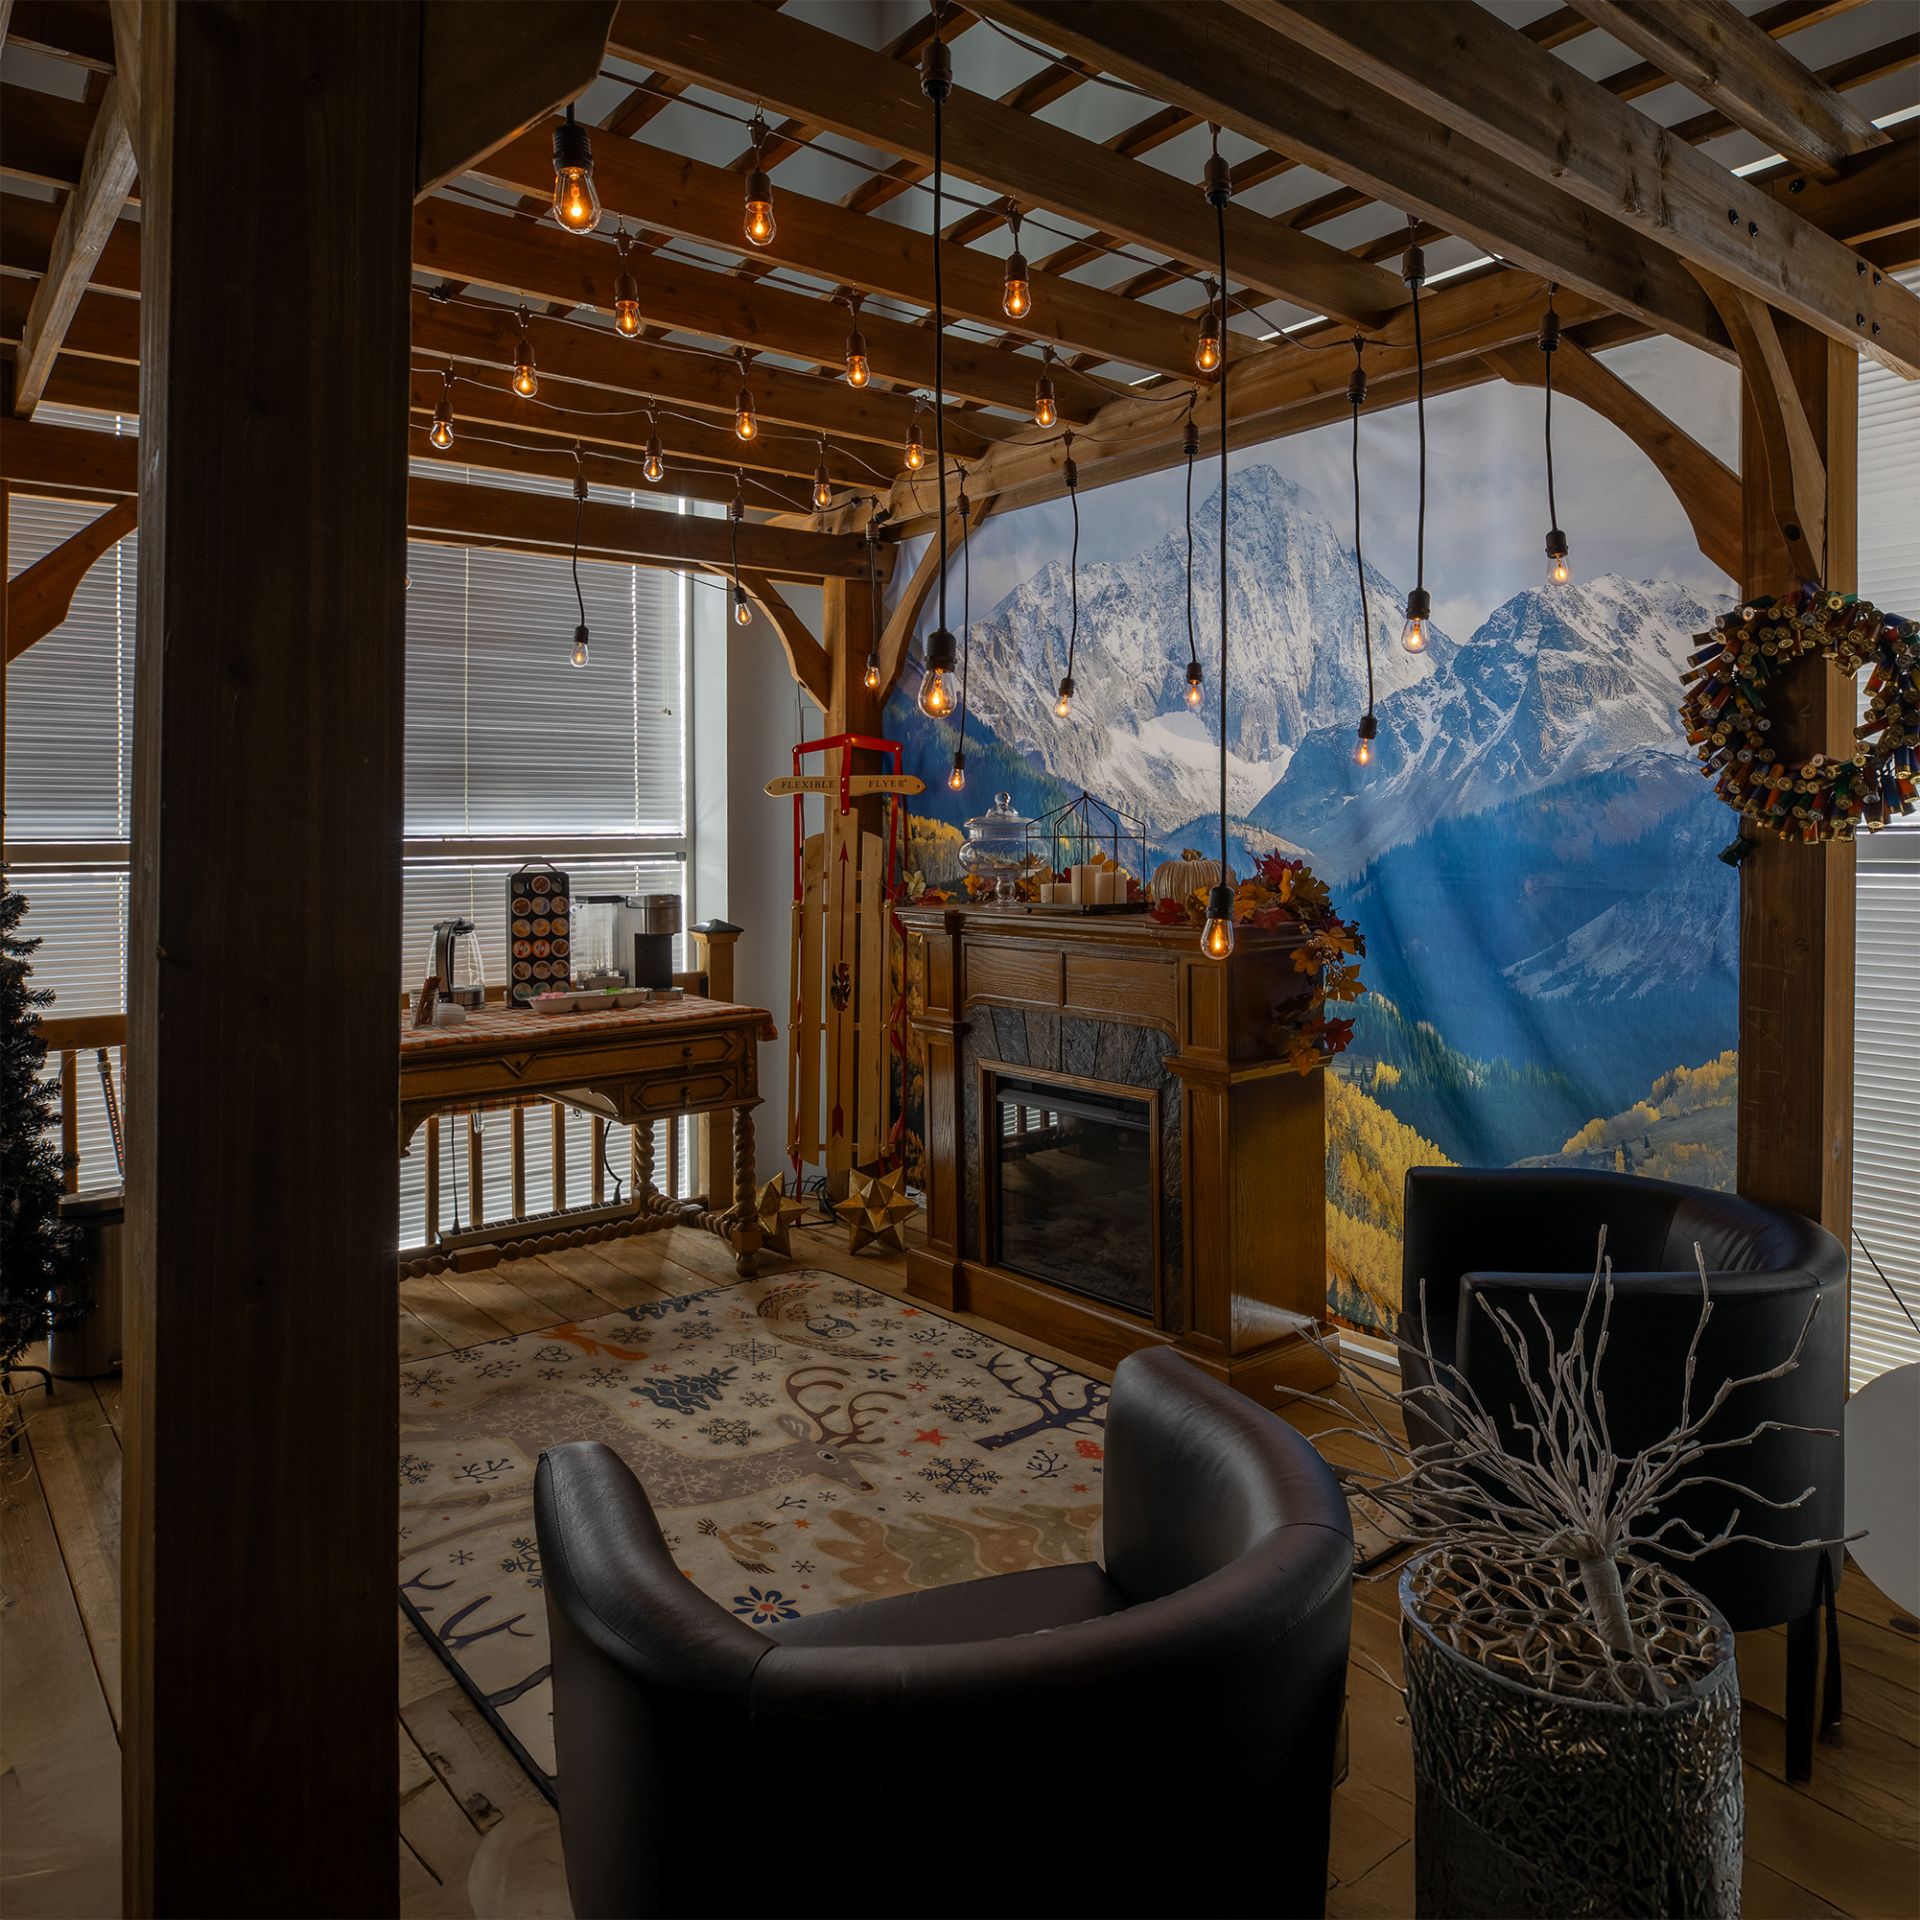
Let your mind visualize your backyard entertaining with creative dimensions like below. Now you have backyard elegance and will be the envy of those neighbors who settled for the standard big box look.

Choose the perfect drop length for your setup from our range of 6", 12", 18", 24", and 36" extensions to create custom lighting effects.

Drop length options

Our range of drop length options

Pergola lighting with drops

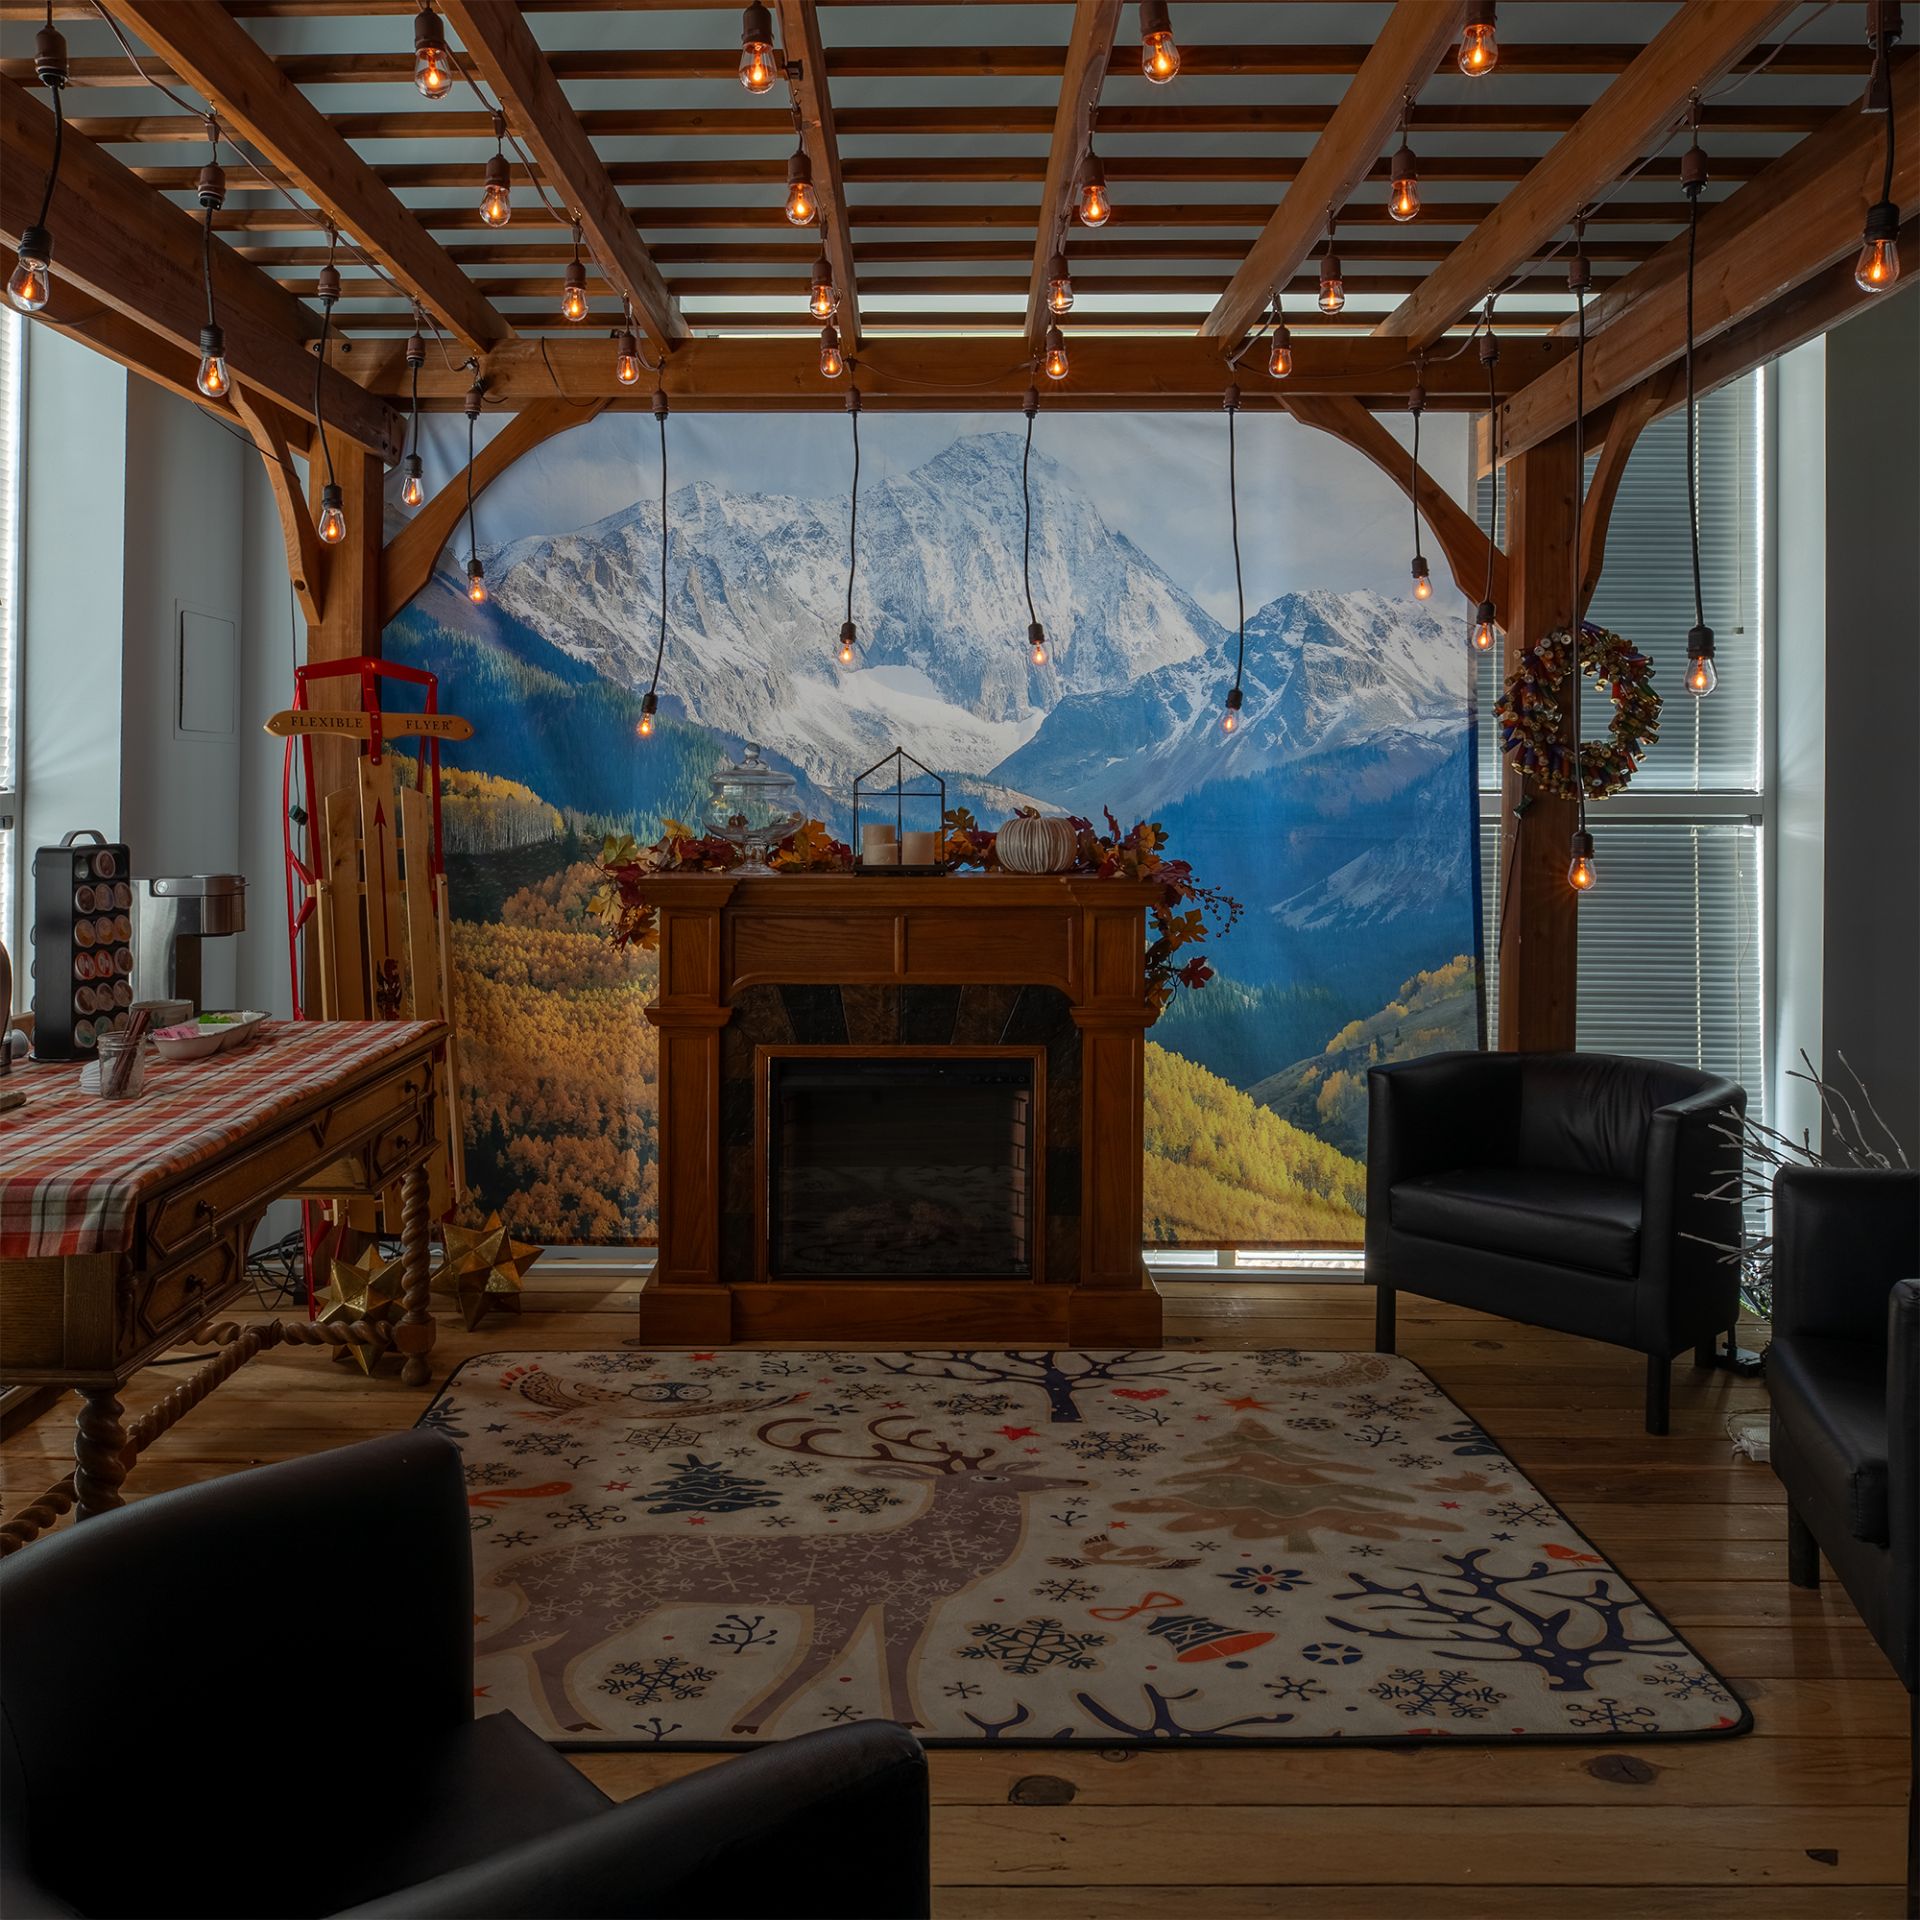
Pergola patio lights using drops

Use longer extensions to highlight dining areas or suspend them around pergolas and structures. The varied heights create stunning dimensional lighting that transforms any space.

Drops can be used with these light strings: See Compatible Light Strings


Elevate Your Outdoor Lighting Today


Transform your patio, pergola, or outdoor venue with Drops. Create a multi-dimensional, designer-inspired look that's sure to impress. Ready to get started?

Get Started with Drops Today. Questions, please call one of our Commercial Sales Managers at 1-800-209-6122

Shop Drops


© 2025 Novelty Lights. All rights reserved.

Decorate Like a Pro: Guide to Pro Grade Holiday Lighting Products


Decorate Like a Pro

Your Guide to Pro Grade Holiday Lighting Products


Learn the fundamentals of holiday lighting to create a stunning, professional-looking display that will make your home the envy of the neighborhood.

Choosing the Right Wire Spacing for Your Lights

The spacing between bulbs on your light strings dramatically affects the overall look of your display. Here's how to choose the perfect spacing for different areas of your home.

Comparison of different bulb spacing on a roofline

Photo: See how different spacing affects the look - 6-inch spacing (top) vs 12-inch spacing (middle) vs 15-inch spacing (bottom) with C9 bulbs. Closer spacing creates a brighter, more continuous line of light.

6 to 18 inches - For Detailed Areas

  • Perfect for rooflines, patios, and front walkways
  • Creates an even, consistent glow
  • 15-inch spacing offers the best balance of cost and beauty
  • Closer spacing means more bulbs but a fuller, brighter appearance

18 inches and wider - For Large Features

  • Ideal for large trees or wide eaves
  • Distributes light efficiently across big areas
  • More budget-friendly with fewer bulbs needed
  • Creates a charming dotted-light effect

Our Expert Spacing Recommendations

  • For rooflines with C9 bulbs: 12-18 inch spacing gives that magazine-cover look
  • Trees with C9 or C7 bulbs: 18-36-inch spacing works beautifully for large trees
  • Mini LEDs: Perfect for small bushes with their compact size and even glow

Pro Tip

If your home has tall rooflines that will be viewed from a distance, consider slightly wider spacing (18-24 inches). From far away, our eyes naturally fill in the gaps, creating the illusion of continuous light while using fewer bulbs.

Choosing the Right Extension Cords for Holiday Lights

Not all extension cords are created equal when it comes to holiday lighting. Understanding the differences will help you create a safer, more durable display.

Comparison of different outdoor light cords

Close-up showing the difference between standard (left) and heavy-duty (right) light cords. Notice the thicker insulation on the right.

Standard Light Cords

  • Thinner, more flexible insulation
  • Lighter weight for easy handling
  • Great for indoor displays or temporary outdoor use
  • Best for mild weather conditions
  • More affordable option

Heavy Duty Light Cords

  • Thicker, more durable insulation
  • Built to withstand harsh weather
  • Ideal for permanent outdoor displays
  • Better protection against wear and tear
  • Worth the investment for long-term use

Custom Length Cords with Vampire Plugs

Vampire plug attaching to light cord

Vampire plug being properly attached to create a custom-length light cord.

  • Also called Gilbert plugs - let you create perfect-length cords
  • Big advantage: No more dealing with too-long or too-short cords
  • Important: Always match the plug type to your cord (standard plugs for standard cords, heavy-duty plugs for heavy-duty cords)
  • Installation tip: Make sure pins go all the way through the wire and the protective cover is secure

Pro Tip

After installing vampire plugs, always give them a gentle tug test. A properly installed plug shouldn't come loose when pulled moderately. This simple check can prevent frustrating outages in your display.

C7 vs C9 Bulbs: Choosing the Right Size

The size of your bulbs dramatically affects your display's personality. Here's how to choose between these two popular options for different areas of your home.

Side-by-side comparison of C9 and C7 bulbs

See the size difference between C9 (left) and C7 (right) bulbs.

C7 Bulbs - The Classic Choice

  • Size: 1.5" diameter, about the size of a golf ball
  • Look: Traditional holiday light appearance
  • Energy use: LED versions use about 0.5 watts each
  • Perfect for: Small trees, bushes, and indoor displays
  • Spacing tip: 18 inches apart works well for bushes

C9 Bulbs - The Statement Maker

  • Size: 1.75" diameter, about the size of a lime
  • Look: Bold, dramatic presence
  • Energy use: LED versions use about 0.8 watts each
  • Perfect for: Rooflines, large trees, and making a big impact
  • Spacing tip: 15-18 inches apart creates a gorgeous roofline
C9 bulbs on a roofline

C9 bulbs installed on a roofline with 12-inch spacing create a stunning outline.

Pro Tip

Use C9 bulbs for areas where you want maximum visibility and impact (like rooflines visible from the street). C7 bulbs work beautifully for more intimate spaces (like front walkways or smaller trees) where you want a softer glow. Always consider how far away your lights will be viewed when choosing sizes.

Gutter Clips: The Secret to Professional-Looking Displays

The right clips make all the difference in creating clean lines and keeping your lights securely in place all season long.

Comparison of different light clips

See the difference between Tuff Clip (left) and All-in-One Clip (right).

Tuff Clips - The Heavy Duty Option

  • Built to withstand tough winter weather
  • Works with both C7 and C9 bulbs
  • Ideal if you take your lights down after each season
  • Durable enough to reuse for many years
  • Easy to install and remove

All-in-One Clips - The Versatile Choice

  • One clip works with multiple light types
  • Handles C7, C9, mini lights, and icicle lights
  • Perfect if you use different light styles
  • Adjustable design fits various surfaces
  • Great for creative lighting designs
Tuff Clip holding C9 bulbs on a gutter

Tuff Clip securely holding C9 bulbs along a gutter edge.

All-in-One Clip holding different light types

All-in-One Clip demonstrating its versatility with different light types.

Installation Tip

Tuff Clips are best for multiple-season use and easy takedown. All-in-One Clips are ideal when you need to work with different light types.

Mini Lights: Small Size, Big Impact

Mini lights offer incredible versatility for creating magical holiday displays. Learn about the different types and how to use them effectively.

Comparison of different mini light styles

Compare Wide Angle Mini (left), C6 (center), and T5 (right) mini light styles.

Wide Angle Mini Lights

  • The brightest mini light option
  • Special lens spreads light evenly in all directions
  • Perfect when you want maximum sparkle
  • Creates a 360° glow around each bulb

C6 Lights - The Traditional Mini

  • Classic strawberry-shaped bulbs
  • Nostalgic holiday light appearance
  • Best for close-up viewing areas
  • Creates a soft, diffused glow

T5 Lights - The Modern Mini

  • Sleek, contemporary look
  • All the benefits of LED technology
  • Perfect for a clean, modern aesthetic
  • Light spreads evenly in all directions

Choosing the Right Spacing for Mini Lights

2.5-inch spacing

  • Maximum light density
  • Perfect for wrapping garlands
  • Ideal for small trees
  • Creates a solid wall of light

4-inch spacing

  • Beautiful balanced look
  • Works for most applications
  • Great for medium bushes
  • Most cost-effective option

6-inch spacing

  • Best for large features
  • Perfect for tree trunks
  • Works well on wide bushes
  • Covers more area with fewer lights
Mini lights with 2.5-inch spacing

2.5-inch spacing creates dense, luxurious light coverage

Mini lights with 6-inch spacing

6-inch spacing provides beautiful, balanced illumination

Pro Tip

When wrapping trees, start with 2.5-inch spacing at the top where branches are thinner, then gradually transition to 4-inch or 6-inch spacing as the trunk widens. This technique creates consistent light density throughout the entire tree for a professionally balanced look.


Your Holiday Lighting Cheat Sheet


Now you're equipped with professional knowledge to create a stunning holiday display. Here's a quick recap of what we covered:

Wire Spacing

Closer spacing (6–18") for detailed areas; wider spacing (18"+ ) for large features.

Extension Cords

Standard for temporary use, heavy-duty for permanent displays or harsh weather

Bulb Sizes

C9 for bold statements on rooflines, C7 for classic charm on smaller features

Gutter Clips

Tuff Clips for durability, All-in-One for versatility with different light types

Mini Lights

Wide Angle for maximum brightness, C6 for traditional charm, T5 for modern style

With these professional tips, you're ready to create a holiday display that will wow your neighborhood and fill your home with festive cheer!

Shop Decorate Like a Pro Kits

All-in-one bundles with bulbs, wire, and clips, curated by our experts for fast, clean installs.

Decorate Like A Pro: Choosing the right tools


Decorate Like a Pro

Choosing the right tools for Christmas light installation


Choose the right tools, stay safe on ladders, and organize your setup for a stress-free holiday lighting project.

LADDER GUIDE

Ladders: Find the Perfect Fit for Your Home


The right ladder makes hanging lights safer and easier. Here are our top picks for different holiday lighting projects.

Multi-position ladder

22 ft Multi-Position Ladder

This is our go to ladder for most homeowners for its adaptiblity and ease of use.

Extension ladder

32 ft Extension Ladder

Ideal for very tall rooflines or reaching second or third story rooflines.

Step stool

Step Stool

Great for smaller jobs like wrapping trees or decorating porch columns.

SAFETY FIRST

Ladder Safety Tips for Homeowners


Follow these guidelines to avoid accidents while hanging your holiday lights.

Height Matters

Extend your ladder 2 feet above the roofline for stability when moving between the ladder and roof.

Quick Tip: Keep your belt buckle between the ladder rails for balance.

Proper Angle

Place the ladder base one-quarter of its length from the wall (the 4:1 ratio) for stability.

Easy Check: Stand with toes touching the ladder feet—your palms should reach a rung at shoulder height.

Stability Check

Test the ladder before climbing—ensure it’s on flat, solid ground and won’t shift.

Warning: Never place a ladder on icy or uneven surfaces.

Safety First!

Following these ladder safety tips helps ensure your holiday decorating is both joyful and accident-free.

MUST-HAVE TOOLS

Tools to Make Light Installation Easier


These tools will save time and frustration when hanging your holiday lights. We recommend keeping them close by during your installation.

Telescoping Pole with Hook

Perfect for hanging lights in tall trees without a ladder.

Wire Cutters

Trim excess wire or cut light strands to fit your space.

Extra Bulbs & Clips

Replace burnt-out bulbs or broken clips on the spot.

ORGANIZATION TIPS

Keep Your Decorating Tidy


A little organization goes a long way in making your holiday light setup stress-free year after year.

Pre-Sort Your Supplies

Use small bins to organize clips, bulbs, and extension cords before starting.

Label Everything

Mark bins for different areas (e.g., "roofline," "trees," "bushes") to stay efficient.

Keep Extras Handy

Store spare bulbs, fuses, and clips in a small pouch on your belt or ladder.

Ready to Decorate Like a Pro?


With the right tools, ladder safety know-how, and a little organization, your holiday lighting project will be smoother and safer than ever. Now go create a dazzling display!

Shop Decorate Like a Pro Kits

All-in-one bundles with bulbs, wire, and clips, curated by experts for fast, clean installs.

Decorate Like a Pro: Electrical Basics for Christmas Lights


Electrical Basics for Christmas Lights


Discover professional electrical techniques that installers use to create safe, dazzling displays that last all season.

INSTALLER TECHNIQUES

Professional Wiring Methods


How the pros ensure safety and longevity in their installations

Extension Cord Strategy

Low-Traffic Areas: Position extension cords in low-traffic areas to prevent tripping hazards and damage.

Roofline Connections: Run extension cords directly to the roofline rather than across walkways to avoid interference with foot traffic and minimize wear.

Avoid Overloading Strands

Check Manufacturer Guidelines: Different light strands have different capacity limits.

Distribute Load: A single 120V outlet can typically handle 350-450 LED bulbs. For larger installations, distribute the load across multiple outlets.

Professional-Grade Materials

Female Plugs on End Runs: Always cap off the end of each run with a female plug to avoid exposed live wires.

Pro Installer Tip: Cheap wiring can lead to breakage or fraying. Investing in high-quality SPT-1 for LED installations and SPT-2 for incandescent ensures durability and safety.

Professional holiday light wiring example

Installation Techniques

Professional wiring organization is crucial for both safety and aesthetics. The image demonstrates pro routing and connection methods that prevent hazards while maintaining a clean appearance.

Installer Tip

Always test your connections before finalizing the installation. A simple socket tester can save hours of troubleshooting later.

POWER MANAGEMENT

Overload Prevention & Power Distribution


How professionals prevent electrical issues in large displays

Professional power distribution diagram

Calculations

Wattage Calculation: Follow manufacturer guidelines or calculate using Watts = Amps x Volts

Amperage Calculation: Calculate by dividing total wattage by voltage: Amps = Watts / Volts

Proper Rating: Ensure zip cords and vampire plugs are rated for the total wattage.

Avoid Daisy-Chaining Dangers

Overheating: Connecting too many strands causes overheating. Split connections across outlets when needed.

Pro Installer Tip: For large installs, distribute load over multiple circuits to prevent tripping breakers.

Professional Testing Methods

Test All Connections: Power on all strands before securing them.

Check for Loose Connections: Tug on connections to ensure plugs and zip wires are secure.

Pro Installer Tip: A socket tester plug quickly diagnoses electrical issues.


Safety First!

Professional installers prioritize electrical safety. Proper load distribution and thorough testing prevent hazards.

CONNECTION TECHNIQUES

Vampire Plugs: Pro Do's and Don'ts


How installers use these essential connectors safely

Professional Best PracticesCommon Mistakes
 

Align the ribbed side of the wire correctly in the plug's channel


Slide the back of the plug forward firmly for a secure connection


Cut a small separation between wires to prevent arcing


Misaligning wires leading to poor connections


Leaving plugs loose causing intermittent power loss


Placing connections where water can accumulate

Professional vampire plug installation

Pro Inspection Techniques

Look for Physical Damage: Cracks, fraying, or other visible wear should prompt immediate replacement.

Replace Worn Plugs: If a plug doesn't close fully or provide a secure connection, replace it.

Installer Tip

Before securing a vampire plug, cut a small quarter-inch separation between the two wires in the zip cord. This ensures the internal plastic divider prevents arcing.

PRO AUTOMATION

Timer Strategies


How pro installers automate lighting for efficiency and convenience

Why Pros Use Timers

Energy Savings: Setting lights to run 6-8 hours nightly maximizes bulb lifespan.

Convenience: Automated operation eliminates manual switching.

Professional Selection

Weatherproofing: Outdoor timers must be rated for weather exposure.

Proper Load Rating: Timers must match or exceed the total wattage.

Pro Timer Comparison

Photocell Timers

Automatically activate at dusk

Off after set duration (4h, 6h, 8h)

Preferred for residential installs

May trigger at different times based on light

Pro Choice: Home installations

Pin Timers

Precise on/off scheduling

Essential for commercial installations

Multiple timers can sync together

Ensure consistency across locations

Pro Choice: Large projects

Pro Troubleshooting Guide

Timer Issues & Pro Solutions

Power Surges

Check if timer was affected by power surge

Resetting Timers

Reset and reprogram malfunctioning units

Connection Checks

Ensure all power connections are secure


Electrical Basics


These professional electrical techniques—from proper wiring to vampire plug installation and timer selection—ensure safe, efficient, and stunning holiday displays. Implementing these pro methods prevents hazards while creating magazine-worthy lighting.

For more professional decorating secrets, explore our full Decorate Like a Pro series

Shop Decorate Like a Pro Kits

All-in-one bundles with bulbs, wire, and clips, curated by experts for fast, clean installs.

Decorate Like a Pro: Mastering Roofline Christmas Lighting


Mastering Roofline Christmas Lighting


Pro techniques and tips for creating stunning, secure holiday displays along your roofline

Choosing the Right Clips

The perfect clip makes all the difference for secure, polished rooflines. Here are expert recommendations:

Shingle clip attached securely to roof edge

Shingle Tab for C9/C7 Bulbs

Best For: Standard shingle roofs without gutters

Key Benefits:

  • Specifically designed for shingle roofs
  • Secure hold without damaging materials
  • Perfect fit for C9 and C7 bulbs

Tip: Ideal for roof peaks without gutters

Clip attached to gutter with C9 bulb

C9/C7 TuffClips Flex Clip

Best For: Gutter installations

Key Benefits:

  • Pre-attach to lights before installation
  • Damage-free removal after season
  • Weather-resistant design

Tip: Top choice for quick gutter installations

Techniques for Polished Results

Achieve perfect rooflines with these expert methods:

Dead loop technique diagram

Expert Secret: Dead Loop

Create a "dead loop" tucked between gutters and wall. This allows easy removal with just a gentle tug - no roof access needed!

Peak clipping technique

Perfect Peaks Method

For flawless peaks: Clip bottom bulbs first, pull tight, then secure peak bulb. Work downward to hide slack at the bottom.

Roof-Specific Installation Methods

Different roofs demand specialized approaches:

Shingle clip installation

Shingle Roof Solutions

Use shingle tabs or all-in-one clips. Important: Never force shingles upward - lift gently to avoid damage.

Tile Roof Solutions

Flex clips or magnetic clips (if applicable) are ideal for these surfaces. Consider the fragility of tiles and ensure clips are placed without undue pressure. Whenever possible, use the gutter to attach your clips instead of attaching directly to the tiles.

Gutter-Specific Techniques

Specialized approaches for different gutter systems:

Open gutter clip installation

Open Gutters

Clip directly to the outside edge of the gutter. Ensure the clip's hold is tight enough to withstand weather conditions.

Leaf Guard Systems

Install lights with shingle clips to the first row of shingles over the gutters. This method keeps the lights from interfering with the leaf guard system while maintaining a professional appearance.

Safety & Efficiency Essentials

Safety and efficiency are critical when working on rooflines. Follow these tips to ensure a smooth and safe installation:

Proper ladder safety techniques

Ladder Protocols

  • Always maintain three points of contact
  • Set on solid, level surfaces only
  • Never exceed weight limits
Proper body positioning on ladder

Movement Techniques

  • Keep body centered on ladder
  • Never push sideways - only straight down
  • Use tool belts to avoid overreaching
Professional lighting installation tools

Installation Efficiency

  • Pre-organize clips before ascending
  • Use clip dispensers for one-handed access
  • Work in sections to minimize movement

Safety Insight

Ladders are more dangerous than being on a roof when used improperly. If done correctly, installing from the roof is often faster and safer.


Create Stunning Roofline Displays


With roofline installations mastered, you can present a polished and professional display that you and passersby will admire. With the proper clips, techniques, and safety practices, you can create a stunning roofline display that adds a whole new dimension to any holiday setup.

Shop Decorate Like a Pro Kits

All-in-one bundles with bulbs, wire, and clips, curated by experts for fast, clean installs.

Decorate Like a Pro: Adding Depth with Ground, Pillar, and Tree Lighting


Decorate Like a Pro

Create Depth By Adding Ground, Pillar, and Tree Lighting


Discover professional techniques to create stunning multi-dimensional christmas light displays by adding ground lights, pillar wraps, and tree lighting that will make your home the envy of the neighborhood.

Beautiful Pathway Lighting

Create magical walkways with these professional ground lighting techniques:

Ground lights installed along a pathway

Proper spacing creates a welcoming path to your home

Soil Matters

Choose stakes based on your soil: wider longer stakes for soft soil, heavy-duty stakes for rocky areas. Shorter stakes work best in hard ground.

Perfect Spacing

Space lights 12 inches apart for balanced illumination. For a dramatic look, reduce to 6 inches. Avoid spacing beyond 18 inches as it creates dark gaps.

Choosing the Right Light Stakes

Stake TypeBest For
12" Universal StakesSoft soil and low-traffic areas
Premium 10" StakesHigh-traffic areas or rocky terrain
5" Speed StakesHard ground where you need a low profile
Universal StakesHard ground areas needing durability

Keep Lights Straight

Use short, sturdy stakes and position bulbs slightly above ground. Avoid high-traffic areas where lights might get kicked or tripped over.

Climate Considerations

In snowy regions, north-facing paths may stay covered longer. Position lights where snow melts faster for maximum visibility.

Ground lights in grass

Sturdy stakes keep lights aligned all season

Pro Tip

Map out your light placement first and avoid high-traffic areas. 

Stunning Column & Pillar Lighting

Transform your home's architectural features with these pillar lighting techniques:

Pillar wrapped with mini LEDs

Evenly spaced mini LEDs create a warm glow

Installation Methods

Use removable hooks for brick or wood. Temporary adhesive works on smooth surfaces but avoid using on stucco to prevent damage.

Perfect Wrapping

Use mini LEDs with 4-6 inch spacing. Match bulb spacing to wrap distance for a consistent look. Avoid spacing beyond 6 inches.

Hide Your Wires

Tuck power cords along sidewalk edges or behind landscape features. Position plugs near porch outlets for easy timer access.

Weather Protection

Use weather-resistant coaxial light strings that seal connections. Keep plugs elevated to avoid puddles.

Coaxial connections provide better weather protection

Pro Tip

Position plug ends near ground level for easy access. This makes connecting timers simple and keeps your display looking neat.

Tree Lighting Techniques

Turn your trees into stunning holiday focal points with these professional methods:

Tree Wrapping Basics

Use C9/C7 bulbs with 12-36 inch spacing for a balanced look. Tighter than 12 inches creates excessive brightness. Wider spacing (24-36 inches) offers a subtle glow.

Branch and Trunk Wrapping

Use mini LEDs with 4-6 inch spacing for beautiful, consistent coverage on trunks and branches.

Preparation is Key

Always test lights before wrapping to avoid redoing work on defective strands.

Tall Tree Solutions

For tall trees, use extension poles. Create "light balls" by loosely wrapping mini LEDs around itself before installation for easier wrapping.

Tree trunk wrapped with mini LEDs

Mini LEDs create a magical glow on tree trunks

Pro Tip

Avoid wrapping trees on windy days - it's frustrating and hard to achieve a clean look. Choose calm weather for best results.

Beautiful Bush Lighting

Add depth to your display with these bush lighting techniques:

Net Lights vs. String Lights

Net lights provide quick, even coverage but are bulkier to store. Mini LED strings are more versatile for multiple uses. Choose based on your storage space and decorating needs.

Preparation

Always test lights before installation to ensure all bulbs are working properly.

Installation Techniques

For net lights: simply drape over bushes. For mini LEDs: wrap evenly with 4-6 inch spacing between wraps. This creates a consistent, professional appearance.

Securing Lights

Wrap lights tightly to prevent string from coming loose.

Bush lit with net lights

Net lights create instant, even coverage on bushes

Pro Tip

Use small garden stakes to secure light strings at the base of bushes. This prevents shifting and maintains your beautiful display all season.

Your Lighting Spacing Guide

Achieve professional results with this spacing reference guide:

FeatureBulb SpacingWrap Spacing
Pathway Lights12 inchesN/A
Columns & Pillars4-6 inches4-6 inches
Tree Trunks (C9/C7)12-18 inches12-18 inches
Tree Branches (Mini LEDs)4-6 inches4-6 inches
Bushes & Shrubs4-6 inches4-6 inches

End-of-Season Storage Solutions

Proper storage ensures your lights last for many holiday seasons:

Large Bulbs (C9/C7)

Remove carefully from trees to prevent damage. Use extension poles for high branches.

Proper light storage

Mini Lights

For net lights: fold carefully. For strings: wrap into balls with the plug at the core.

Pillars & Columns

Remove hooks or adhesive carefully. Wrap mini lights into tight balls for compact storage.

Pathway Lights

Remove stakes gently. Some styles allow you to keep lights attached to stakes for easier setup next year.

Storage Solutions

Use clear storage bins with labels. Zip-tie strands together and note their location. Proper storage ensures your lights will look beautiful for years.

Preserving Your Investment

Taking down lights carefully and storing them properly extends their lifespan and keeps your display looking perfect year after year.


Create a Winter Wonderland


By adding pathway, pillar, and tree lighting, you can create a multi-dimensional display that adds depth and magic to your holiday decor. Attention to spacing, proper installation techniques, and careful storage will ensure your home shines brightly for many seasons to come. With these professional tips, your holiday display will be the talk of the neighborhood!

Shop Decorate Like a Pro Kits

All-in-one bundles with bulbs, wire, and clips, curated by experts for fast, clean installs.

Certified Installer: Why Starting a Christmas Light Installation Business Could Be Your Brightest Idea Yet


Why Starting a Christmas Light Installation Business Could Be Your Brightest Idea Yet


Discover how this seasonal venture can deliver serious profits with minimal overhead

Thinking about starting a Christmas light installation business but not sure if it's the right move? You're not alone. Many entrepreneurs and service business owners are discovering how this seasonal venture can deliver serious profits, minimal overhead, and satisfied customers, all while working just a few months out of the year.

Here are the top four reasons why partnering with Novelty Lights' Certified Installer Program could be your ticket to a thriving, high-margin business:

Tremendous Growth Opportunities

The holiday lighting industry is booming. Americans spend billions of dollars every year on Christmas and holiday decorations, and the trend isn't slowing down. In fact, studies show that decorating for the holidays can boost mood, which has led to people decorating earlier and going bigger than ever before.

Even in tough economic times, demand for professional light installation has stayed strong. The industry has proven remarkably resilient through recessions and even pandemics, making it a stable, long-term business opportunity.

High-Profit Margins

Holiday lighting is one of the rare seasonal services with incredible margins. Customers are willing to pay for hassle-free, professionally installed displays that make their homes and businesses stand out.

If you're adding this service to an existing business, you can see margins between 25–45%. Starting from scratch? You can still achieve 30% margins or higher. With the bulk of installations happening over just a few months, many installers make a significant portion of their annual income in this short window.

Low Startup Costs

Getting started is easier (and more affordable) than you might think.

If you already own a service-based business, chances are you have most of the essentials: vehicles, trailers, ladders, and tools. For newcomers, the required equipment is surprisingly minimal, allowing you to deliver professional results without a huge upfront investment.

To make it even easier, Novelty Lights provides a detailed startup guide, including the tools and products you need to hit the ground running.

Stand Out from the Competition

While competition exists, many installers aren't catering to high-end clients or offering the premium products and customer experience that people are willing to pay for. That's where Novelty Lights comes in.

Our Certified Installer Program equips you with top-tier products, hands-on training, and certification helping your business stand out as a trusted, professional service provider in your market.

Ready to Light Up Your Business?


Join the Novelty Partner Program it includes our Certified Installer Course  and unlock training, tools, and support to grow a profitable lighting business.

Plus: preferred pricing, and more partner-only benefits.

Certified Installer: Ready to Start Your Own Christmas Light Business? Here's How Novelty Lights Can Help


Ready to Start Your Own Christmas Light Business? Here's How Novelty Lights Can Help


Our 8-step plan to help you gear up for a profitable holiday season

So, you're thinking about starting a Christmas light installation business but aren't sure where to begin. Good news: you've found the right partner.

At Novelty Lights, our Certified Installer Program is designed to guide you every step of the way, from your first training session to your first installation. Here's our 8-step plan to help you gear up for a profitable holiday season.

Step 1: Apply for the Certified Installer Program

Your journey starts by joining the Novelty Lights Certified Installer Program, the first step toward building a successful holiday lighting business.

What you'll get:

  • Access to our Certified Installer 101 course, your complete guide to starting and running a holiday light installation business
  • Personalized support from a Commercial Account Manager to answer questions and guide you through the process

Once you complete the program and earn your certification, you'll unlock exclusive wholesale pricing and become an approved partner with access to professional-grade products at industry-only rates.

Step 2: Complete Your Certified Installer 101 Course

The Certified Installer 101 course covers everything you need to hit the ground running.

You'll learn:

  • Marketing strategies to grow your business
  • Installation techniques for professional results
  • Safety protocols to protect your crew and clients
  • Markiting materials and leeds

By the end of the course, you'll be confident, certified, and ready to take on your first season.

Step 3: Unlock Your Wholesale Account and Order Products

Once certified, you'll gain access to exclusive wholesale pricing, giving you industry-leading products at competitive rates.

You can shop directly on our website or work with your Commercial Account Manager to build your first order. Whether you are lighting a few homes or an entire neighborhood, we'll help you stock up with everything you need to be successful.

Step 4: Build Your Marketing Strategy

Marketing is the key to getting your business off the ground.

Our guides and templates include:

  • Cost-effective advertising strategies
  • Free to use marketing materials
  • Social media tips to grow your local presence

This foundation helps you build a steady stream of customers before the season even starts.

Step 5: Hire and Train Your Team

Every successful lighting business needs a reliable crew.

We recommend at least two installers per job for safety and efficiency. To help you staff up, we provide:

  • Tips for finding great seasonal workers on platforms like Indeed and Facebook Jobs
  • Advice on training your team

Step 6: Prepare Your Equipment

It's not just about the lights. You'll need organized vehicles, trailers, and tools to keep jobs running smoothly.

We provide:

  • A dedicated chapter highlighting the tools you need
  • Pro tips for optimizing your setup

Step 7: Start Installing and Grow Your Business

With customers lined up, your crew trained, and supplies stocked, you're ready to get to work. Transform homes and businesses into festive showcases while adding a significant revenue stream in just a few short months.

Why Partner with Novelty Lights

The holidays come quickly, but with Novelty Lights in your corner, you'll be fully equipped to launch and grow your business. From professional-grade products to hands-on training and ongoing support, the Certified Installer Program helps you stand out in the market.

Ready to Light Up Your Business?


Join the Novelty Partner Program it includes our Certified Installer Course  and unlock training, tools, and support to grow a profitable lighting business.

Plus: preferred pricing, and more partner-only benefits.

Certified Installer: Hiring Ads for Your Christmas Light Installation Business


Hiring Ads for Your Christmas Light Installation Business


Cost-effective strategies to build your dream team this holiday season

Finding the right employees is critical for a successful holiday season, especially in the Christmas lighting industry where dependable, hardworking staff can make all the difference. At Novelty Lights, we know hiring seasonal help comes with challenges, but it doesn't have to strain your budget.

Here are some cost-effective methods to help you build a strong team this season.

Free: Employee Referrals

One of the most affordable and reliable ways to find new employees is through your existing staff. Ask if they know friends or family members interested in seasonal work. Referrals often lead to better hires since they come with a personal recommendation.

To motivate your team, consider starting an Employee Referral Program. Offer a reward once their referral works a set number of hours. This approach helps ensure you're not paying for someone who quits after a single shift.

Paid: Indeed

Indeed is a popular platform for sourcing quality candidates. You can post job ads for free, but if you want more visibility, consider sponsoring your post. Sponsored ads allow you to set a daily budget to reach a wider audience.

For example, a $5 per day sponsorship can quickly increase applications, but be mindful of your budget. Once your positions are filled, deactivate the sponsored post to avoid unnecessary charges. You can also save your job ad for use in future seasons.

Paid: Facebook Jobs

Facebook is another effective tool for reaching potential hires. Posting a job on your business's Facebook Page is free, and you can sponsor posts starting at around $10 to boost visibility to a larger local audience.

If your business does not yet have a Facebook Page, now is the perfect time to create one. It can serve both as a recruiting tool and as a way to promote your services to potential customers.

Paid: ZipRecruiter

ZipRecruiter offers wide reach but requires a monthly subscription. Results can vary, so weigh the cost against your hiring needs. With targeted ads, you may be able to find qualified candidates quickly, but be sure to factor the subscription fee into your seasonal budget.

Crafting an Effective Job Ad

The success of your hiring efforts depends on a clear and accurate job description. Be specific about the role and expectations. For example, if you need Christmas light installers, avoid using a generic title like "Seasonal Help" that could attract unqualified applicants.

Consider including pay rates if you are comfortable doing so. This can help filter out candidates who may not align with your budget, saving time during the screening process.

Ready to Light Up Your Business?


Join the Novelty Partner Program it includes our Certified Installer Course  and unlock training, tools, and support to grow a profitable lighting business.

Plus: preferred pricing, and more partner-only benefits.

Certified Installer: Stay Organized with Novelty Lights' Product Overview


Stay Organized with Novelty Lights' Product Overview


Choosing the right materials ensures your installations are professional, efficient, and built to last

At Novelty Lights, we know how important it is to understand your products when planning holiday lighting projects. Choosing the right materials ensures your installations are professional, efficient, and built to last.

As part of our Certified Installer 101 course, we provide in-depth training on all of our core products, teaching you how to use them effectively in real-world installations. Below is a quick overview of some of our most popular products and their common uses. Many of these are versatile and can be applied in multiple ways to create stunning displays.

Filament C9 Bulb

Our newest LED bulb, made of durable plastic with a clear finish. Ideal for rooflines, window outlines, and stake outlines. It retains brightness over multiple seasons and recreates the warm glow of traditional incandescent bulbs.

Faceted C9 Bulb

A classic LED bulb with a diamond-patterned, shatterproof exterior. Perfect for long rooflines and high-visibility areas. While its color may fade over time, it remains a dependable option for vibrant holiday displays.

5MM Mini Lights

Compact lights on strands of 100, commonly used to wrap trees, bushes, garlands, and wreaths for a festive glow.

Snowflakes

Large specialty décor pieces made from metal frames and rope lighting. Available in multiple sizes, they are ideal for hanging in trees or mounting on buildings.

Starlight Spheres

Flexible and adjustable, these spherical designs create standout features when suspended from trees or other elevated spaces.

Wreaths

Artificial greenery designed to look lush and realistic. Available in multiple sizes and pair perfectly with Mini Lights for columns, monuments, or doorways.

Garlands

Nine-foot strands offered in 14-inch and 24-inch thicknesses. Ideal for wrapping railings, columns, and mantles. Add Mini Lights for a refined, festive touch.

Premium Bows

Structured red nylon bows with thin metal frames and gold trim. Ideal for wreaths, garlands, lamp posts, and both indoor and outdoor displays.

SPT-1 Wire

The most widely used wire for Christmas lighting. Essential for connecting male and female plugs to maintain consistent power flow.

Male & Female Plugs & Splicers

Quick-connect plugs designed for SPT-1 wire. These make installation faster and more secure.

C9 Spool Sockets

Available in multiple spool sizes, allowing you to customize and install C9 bulbs with ease.

C9 Magnet Clips

Small magnetic clips that attach C9 bulbs to metal surfaces such as roofs or bridges.

Shingle Tabs

Designed for easy installation of C9 bulbs under most roof types, except Spanish tile. These tabs keep rooflines neat and secure.

Universal Gutter Clips

A versatile clip for securing C9 bulbs along gutters and roof edges.

Universal Stakes

Sturdy ground stakes for securing C9 bulbs along sidewalks, driveways, and flower beds.

Digital Timer

A programmable timer that offers both preset and customizable schedules for effortless lighting control.

Ready to Light Up Your Business?


Join the Novelty Partner Program it includes our Certified Installer Course  and unlock training, tools, and support to grow a profitable lighting business.

Plus: preferred pricing, and more partner-only benefits.